Hack A Quilt Tote

I was at the beach this week for fall break and wrote a post that was supposed to appear instead of this one. Then I got home last night and decided to make a bag for Mary’s Hack That Tote! blog tour instead of my wimpy little post. Seems reasonable, right? 5 days of travel surely meant I had time to come home and make a bag. Well, in my head it did.

I planned to make a tote for Quilt Market LAST YEAR and failed. I ran out of time and couldn’t get it together. No biggie. I sat on the fabric for a FULL YEAR ready to make something but never really carved out the time for myself to do it. Always wanting to make a bag but couldn’t get it together.

img_8805

So when Mary asked me to participate in a book tour for Hack That Tote! I KNEW I had to make a tote bag with this fabric. I knew it! Then, once again, I ran out of time. I clearly have time management issues. And small children.

11181-frontcover-25058-1459187310-1104-1280

I digress, though.

I LOVE a good tote bag. I mean, seriously LOVE…so picking my favorite pattern was a breeze. My specifications are big and kinda slouchy – sorta like this bag I bought several years ago.
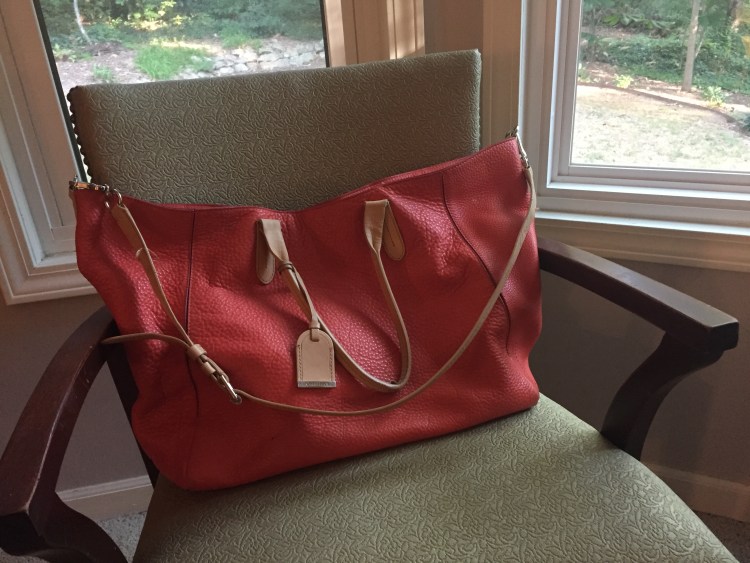
img_8806

The obvious starting point for me is the pool tote.

img_8981

Using Mary’s tips about sizing up and down your tote, I grabbed my calculator and increased the size 10%. Not a lot, but enough to hold a good size quilt and supplies for binding.

img_8982

I lined each piece with a heavyweight non-woven fusible interfacing and added a small pocket to each side of the lining pieces.

img_8985

I made the interior following the steps for the Basic Tote.

img_8991

I attached cotton webbing to each side of the exterior tote bag before sewing the pieces together. Because I planned to use this as a bag to tote half finished, in need of binding quilts and other projects, the straps are rather long to accommodate the bulk of quilts.

I sewed the straps across the top, bottoms, sides and made an “X” in the center for stability. I also added an extra piece of interfacing on the back where the straps attached (something like 4″ x 15″).

img_9001

I placed the lining inside the exterior of the bag, wrong sides together. I pinned the top, attached a bias binding and voila!

img_9002

img_9005

fullsizerender-9A quilt tote is born! The bag has a lap quilt AND and full size quilt in it with room to spare. Perfect for carrying around projects! I’m so excited about it!

Aside from showing you how to take a basic pattern and changing it into virtually any kind of bag, Mary also has great information about interfacings, fabrics and accessories for your bag. For a chance to win a copy of your own Hack That Tote! be sure to follow my blog and leave a comment about your favorite tote hack below or a hack you’d like to make.

I’ll pick a number using random.org for the winner (announced on 10/7). Winners in the States will receive a copy of the book, and winners outside the States will receive an e-book.

You can follow along and leave comments on all the blogs below to increase your chances to win this incredible book!

9/27 C&T  http://www.ctpub.com/blog/
9/28 Sue O’Very http://sueoverydesigns.com/blog/
9/29 Gen Q Teri Lucas http://generationqmagazine.com/
9/30 Patty Murphy  http://pattymurphyhandmade.com
10/1 Vanessa Lynch http://punkinpatterns.com/blog
10/2 Lindsay Conner http://lindsaysews.com
10/3 Stephanie Moore http://www.alittlemooreblog.com
10/4 Katy Cameron http://www.the-littlest-thistle.com
10/5 Kim Niedzwiecki http://www.gogokim.com
10/6 Mary Abreu  http://confessionsofacraftaddict.com

Happy Hacking!

Piecing Makeover Blog Book Tour + Giveaway

What a week it’s been! Wow! Thanks for all the love, y’all! The week was such a success and I couldn’t have done it without C&T Publishing, AnneMarie, Jodie, Teri at GenQ, Sandi, Mary, and Kristin. Really big thanks to each of you!

My biggest tip to share is to ask for help. I mean – How easy is that!? Seriously, though. When I first started to quilt I always asked my mom but not everyone has a mom that sews, or is near. However,  if you are fortunate enough, your local quilt shop has staff on hand to help you work through your problems. Yes, it means another trip out, and you might come home with more fabric but getting inspired while getting help is fun! And I promise they LOVE to help figure out your quilting problems! If the shop can’t help, they will find someone that can. Honest.

If you don’t have a quilt shop near you, go online to see if you can find the answer to your problem, or send a message to a quilter via a blog or read a book – perhaps, mine?  A little time to noodle on the issue might work for you, too. Don’t be afraid to explore possibilities. And if you are worried about messing up your favorite piece of fabric, experiment with some muslin, or old scraps until you’ve solved your problem.

Most importantly, remember it’s okay to make mistakes. It’s how we learn. I have quilts riddled with errors and almost every quilt I make throws me for a loop at some point or another – I really should plan more! But I’ve learned a lot. Some of my (ahem) older friends have been a valuable source of knowledge, too.

11170_cover_rev__42536.1464900468.368.475

C&T is giving away one copy at each stop along the way and today is your last chance to win a copy of Piecing Makeover  for yourself (printed copy in the U.S. and e-book outside the States). Leave a comment on the blog and we will announce the winners tomorrow.

Here’s the list again so you can check to see if you have won on another page. Winners will be chosen at random using random.org number generator.

9/13  AnneMarie Chany http://www.genxquilters.com/
9/14 Jodie Carleton http://vintagericrac.blogspot.com/
9/15 Teri Lucas/Gen Q Magazine  http://generationqmagazine.com/
9/16 Sandi Hazlewood http://www.craftyplanner.com/
9/18 Kristin Esser https://kristinesser.com/
Happy piecing, everyone!

*edited on 9/20 – Congratulations to Sally for winning a copy of Piecing Makeover!

Piecing Makeover Blog Book Tour

Hey everyone! My blog book tour starts today. I have a rock star list of participants, beginning with C&T today!

Every day, visit the blog of a participating author, designer, or sewist for your chance to win a copy of my book, Piecing Makeover!

Here’s the official line up:

9/13  AnneMarie Chany http://www.genxquilters.com/
9/14 Jodie Carleton http://vintagericrac.blogspot.com/
9/15 Teri Lucas/Gen Q Magazine  http://generationqmagazine.com/
9/16 Sandi Hazlewood http://www.craftyplanner.com/
9/18 Kristin Esser https://kristinesser.com/
Make sure to leave a comment on each blog for your chance to win. At the end of the tour, winners will be announced. C&T will mail a copy of the book to you. Winners outside the U.S. will receive an e-copy.
Happy Piecing!

Evolution of a Quilt

It started out rather simply. I had a plan, sketched it out, dug through my stash then bought more fabric. Execute. Right? Well, it went that way until it was time to make said quilt.

It was a cool diamond and hexie quilt with an interwoven lattice. I decided to make the diamonds large, so I could piece the top faster. Unfortunately, I made them too large, and by the time I finished I had 20 diamonds that were 20″ from point to point on the long side, meaning my quilt would have covered the living room floor. No bueno.

So began the task of moving around my pieces and figuring out how in the world I could turn what I’d made into a really fantastic quilt. I was frustrated and thought I’d spent a lot of time and money on a quilt that wasn’t going to happen. And, among other things, I knew I didn’t need more random quilt blocks on my studio floor. After several failed iterations on my design wall, I put the diamonds next to each other.

I paused.

I looked at it.

I liked it.

I waited.

I looked more.

I still liked it.

And so began the evolution of this quilt. img_8580

I’m tackling the borders today because, as one might guess, I changed my mind on them and this quilt will go into another evolution.


Piecing Makeover

box web

My book arrived last week. Friday to be exact, yet it took me a day to open the package. I’m not quite sure why. Maybe it was because it meant the exciting chapter of writing a book was over. Maybe I was a little scared. I know I was anxious about seeing it, which is funny because I KNEW how my book would look, but alas, I waited. Quiet contemplation, perhaps? And how would I feel the moment I could see what I’d been working on for a full year and a half come to fruition?

It actually took me a day and a half to rip into the box. I may have waited longer but Mary’s book arrived the same day and we opened our books together. Yeah, yeah, such girls (also, you should check out her new book. It’s incredible!).

I grew up sewing. My Mom taught me to sew when I was 6 and by the time I was in high school I had mastered Very Advanced Vogue patterns. At 18, though, my interest in quilting was piqued. The art of quilting was very much starting a revival and I wanted to get on board. I helped Mom make a few quilts through the years, but I wanted to make my own. Mom took me to a local quilt shop and we picked fabric for me to make my first quilt. It was far from perfect but it was perfect to me!

My journey began there, at that shop, well before I even knew it, and part of my journey and my dream was realized with this book. I wished for this book for myself when I was just beginning to quilt. I wanted it for a few reasons. As a bit of a self-proclaimed perfectionist with my own work  (hey, Mom has a degree in fashion design so I picked up all kinds of habits and thoughts about my work), I wanted my quilts to be perfect. I didn’t know how to make that happen AND I didn’t have an extra $30 for a class – it wasn’t a priority for me. I could, however, always find an extra $30 for a good quilting book – one that would teach me a few things and serve as a great resource and learning tool.  But none of the books I ever purchased had ALL the things I wanted to know. This one won’t have all  of them either, but it sure has a lot!  My hope is that this book will help you gain confidence and skills in your piecing REGARDLESS of your quilting style – it’s not about modern vs. traditional it’s about making your work better. I’m eternally grateful that C&T saw my vision, too.

book web

I’m not going to lie when I say that seeing a book with YOUR name on it is overwhelming, and magical, and exciting, and kind of crazy! Sadly (?) what has continued to run through my mind for the last year and a half is Sally Field receiving an Oscar – “They like me! They really like me!” This journey has been phenomenal, and C&T has been incredible to work with every step of the way! I’ve had many cheerleaders throughout the years, and I’m happy to add the staff at C&T to that list. They even sent me  a card along with my book, full of wonderful sentiments about my work from all the amazing people that helped me make it!


Quilts for …..

Last week we woke up to an unspeakable tragedy, and as usual, quilters jumped right in to help. I was compelled to make few block to send to the Orlando Modern Quilt Guild, along with some binding, and then a friend asked me why I was doing it. Why am I sending blocks?

pulse web

You know, when you are asked a question like that, it kinda makes you think. Why was I doing it? What would compel a person to send blocks and supplies for quilts to people I don’t even know? The answer is simple: LOVE.

Steven Colbert coined it perfectly when he said “Love is a Verb and to Love is to Do”. And that’s what quilters do. This is how we band together for the greater good. In a time of tragedy, any tragedy, not just Orlando, this is how we can show strangers that we care. Think about it. To receive a quilt, a handmade gift always associated with love and kindness and warmth is truly a gift for people during a trying time. When one might be angry, or full of despair, or any other range of emotions, getting literally get wrapped in warmth and love is a great way to help people find comfort. Even if they are strangers.

So that’s why we do it. We can. We can do something good to help others.

Even if it’s only a quilt.

Pointed

Every so often I make a quilt that requires me to sew points at a bulky intersection. Over the years I have tried different things but find my best tip is to use pins. It seems counterintuitive, right? The pins will shift your points when you go through all the layers of fabric. Or will they?

Yes. If you pin through multiple layers of fabric at a bulky intersection with a point that will happen. But what if you use the points as a guideline?

Here’s how I handle that.

1. I stick a straight pin through the point on each piece.

First side


Through both points.

2. Nestle the pieces together so the pin is perpendicular to the fabric.


3. Place two straight pins on either side of the pin going through the point, about 1/8″ at most.

4. Push those pins through the fabric and remove the center pin.


5. BASTE the edge. 90% of the time this works. To avoid ripping out stitches, I baste first to make sure I’m sewing exactly through the points. It’s much easier to take out basting stitches and its gentler on your pieces.

6. Once your basting stitches are correct, sew over them with a regular stitch.


7. Press your pieces. Many times, seams with lots of bulk are great candidates for furling, but not always. And this seam wasn’t completely cooperating so I called it a day. It’s flat enough and a machine will easily be able to get through the intersection to quilt it.


8. Enjoy!

New Ironing Board (kinda)

About a year ago I replaced my ironing board. I wanted one that was wider and had a place to rest my iron. I searched a bit and found one. Unfortunately, I didn’t read the fine print about this particular ironing board – maybe I didn’t read at all?  – it was made from an eco-friendly material.

Now I’m all for eco-friendly products. Really, I am. However, after a year of heavy use the ironing board started to warp and it was wreaking havoc on my work. I’m definitely one to stress the importance of pressing your work and mine looked like I didn’t even own an iron! Not good.

warped

I was frustrated and feeling lazy. I didn’t really want to buy a new ironing board since mine was, theoretically, new and as much as I love Amazon Prime I didn’t want to wait a day OR go to Target to get one because I’d walk out with an entirely new wardrobe, home accessories and decor, and a crate full of paper products. I was, however, up for making my own. I mean, if I can’t buy what I want I should make it, right? Exactly! Besides, a bigger board would definitely come in handy. Go big or go home.

I looked around my sewing room and found batting, fabric, and some Insul Fleece that C&T sent me. The factor limiting me the most in this build was the size of the Insul Fleece. It’s 27″ x 45″. I can get more but then I’d have another delay, so that was out. Keeping that in mind, I headed to my local home improvement store and bought a board.  I found a 2′ x 4′ piece of composite lumber that would be perfect. I knew I’d have to piece the Insul Fleece, but for a whopping $4.32 I knew I could boost the crafty and make it work.

So I loaded up the car and headed home.

materials

I grabbed my staple gun and some staples and got to work. I wrapped a double layer batting around the board first, making sure to pull it taut and miter the corners.

wrapped

If you pull the corner of the batting into a triangle over the corner of the wood you can miter the pieces when you staple up the sides.

back stapled

stapled

I cut the Insul Fleece into 2 pieces by cutting 3″ off the width, making the first piece 24″ x 45″. I wrapped the Insul Fleece over the batting and tacked it down. I did the same thing with the smaller 3″ x 45″ piece at the end. I tugged a little on all sides and managed to make it fit (forgetting to take photos, too).

Once I had the batting and Insul Fleece stapled onto my board I covered it with some Moda Ash. I contemplated a more exciting fabric but I had enough of this on hand, it matches my decor and it’s easy to see stains and messes (not that that EVER happens) and I don’t have to worry about ruining a favorite piece of fabric.

voila

This picture doesn’t quite do it justice, and sorry for the VERY messy, thread covered design wall, but this board is incredible! It’s super wide and the Insul Fleece is my new favorite thing EVER! It works so well for an ironing board. I hate to say it but I was kind of amazed in the most wonderful way. Yay for perfect piecing and pressing and inexpensive, creative solutions.


Warrior Quilt

An old friend of mine was diagnosed with Stage 3 breast cancer last fall. I planned to make her a quilt to have while she was going through chemotherapy but I overcommitted. Well, that’s what I thought. It turns out I was severely vitamin D deficient and had NO energy. My doctor took my concerns about being tired to a fault to heart and ran a few tests to figure that out. Mega doses of Vitamin D and I’m back in the saddle again. Fortunately for me, I had an easy fix. Unfortunately for my friend, she’s still fighting the good fight but she is truly a warrior. Chemo and a double mastectomy. No choice a young mother should make but she’s strong as an ox and I know she’ll get through this.

I’m in awe of her. I really am. You don’t realize how important your health is until you don’t have it. That point hit home over the last 6 weeks. What I’ve been dealing with pales in comparison to her battle. I mean, really, my issue is a small scratch on the surface; but when I was feeling completely and utterly exhausted all the time for no apparent reason, well, that was tough. It was beyond tough.

I finally got my act together and made her this quilt. Many months later than planned but it happened. My friend sent the sweetest note to me when she got it. Deeply touched by the gesture. Indeed it truly is better to give than receive. Unless it’s your birthday, then it’s fun to receive 😉

IMG_6725

I used  Anna Maria Horner’s Dressmaker on the back. I absolutely ADORE that fabric! I should have bought more. It wasn’t quite wide enough so a small strip of another AMH print and I was set. I quilted straight lines at angles across the quilt with my walking foot. No rhyme or reason, just random, for a fun look. The lines are (ahem) mostly straight, too.

More Scrap Quilts

I have been busy sorting and cutting my scraps. I have entirely too many. A friend of mine suggested I toss them. Can you believe that?! I scoffed that the idea. It did, however, encourage me to start using them. Maybe.

I’m going on a quilt retreat in a few weeks so my plan is to cut now and so I can spend almost 3 days sewing. Sounds like a plan, eh?

I’m starting with this pile.

IMG_6522

and cutting my strips to 1 1/4″ each.

IMG_6534

It’s a weird size, I know. Not all of my scraps were large enough to make 1 1/2″ strips and I decided 1″ strips would be too small to deal with once they were pieced. I see no reason to have finished 1/2″ strips for this. That makes for precise work and a lot of sewing for what should be a quick and easy log cabin quilt.

The centers will be dark grey because: why not. Ready to get started but I think I have 2 other tops ahead of it. Maybe? I’m starting to lose count….